
Gather a pair of sharp “scissor-style” dog nail clippers,
styptic powder (or cornstarch) for potential bleeding, and
high-value treats. Hold the paw firmly but gently, extend
the nail by pressing the toe pad, and cut the tip at a
45-degree angle, stopping just short of the pink or dark
“quick” (the blood vessel).
For the complete grooming foundation that applies across
every breed,
the complete home dog grooming guide
covers tools, technique, and troubleshooting in one place.
My dog’s first nail trim at home went sideways fast. I clipped too deep, hit the quick, and blood went everywhere. She panicked. I panicked. That vet bill cost more than three months of groomer visits.
But here’s what I learned: that one mistake didn’t have to happen. The difference between a clean trim and a bleeding nail comes down to technique and the right tools—not luck.
This guide on how to trim dog nails at home covers exactly what I wish I’d known first: the angle, the depth, handling anxious dogs, and what to do when (not if) you slip.
Why Black Nails Make Everyone Nervous?
On a clear or white nail, the quick — the blood vessel and nerve running through the center — shows as a pink line you can see right through. On black nails, it’s hidden, and that uncertainty is the biggest reason people avoid trimming or cut too short.
Two techniques work better than guessing, and almost no other guide puts them together.
- The pressure test. After each small cut, press a fingernail gently into the cut surface. Hard means safe to continue. Slightly soft or springy means stop — you’re near the quick.
- The underside test. Flip the paw over and look at the bottom of the nail. Nails are subtly U-shaped, and past where the quick ends, the underside turns slightly hollow or concave instead of solid. Professional groomers use this far more than most articles mention.
Either way, you’re watching for the same change: a small dot or ring appearing as you get close — chalky to some, jellybean-shaped to others. Once you see it, stop.
What You’ll Need
- Standard nail clippers (scissor-style or guillotine-style — whichever feels more controllable in your hand)
- A nail grinder as a slower, gentler alternative, especially useful for nervous dogs or anyone who’s quicked a nail before
- Styptic powder — this is non-negotiable, not optional
- Cornstarch or flour as a backup if you’re out of styptic powder
- High-value treats — small, soft, and reserved specifically for nail sessions if possible
- A bright lamp or flashlight — Such as LHKNL Headlamp Flashlight for thin or light-colored nails, you can sometimes shine light through from behind to see the quick directly
How to Cut Dog Nails Safely?
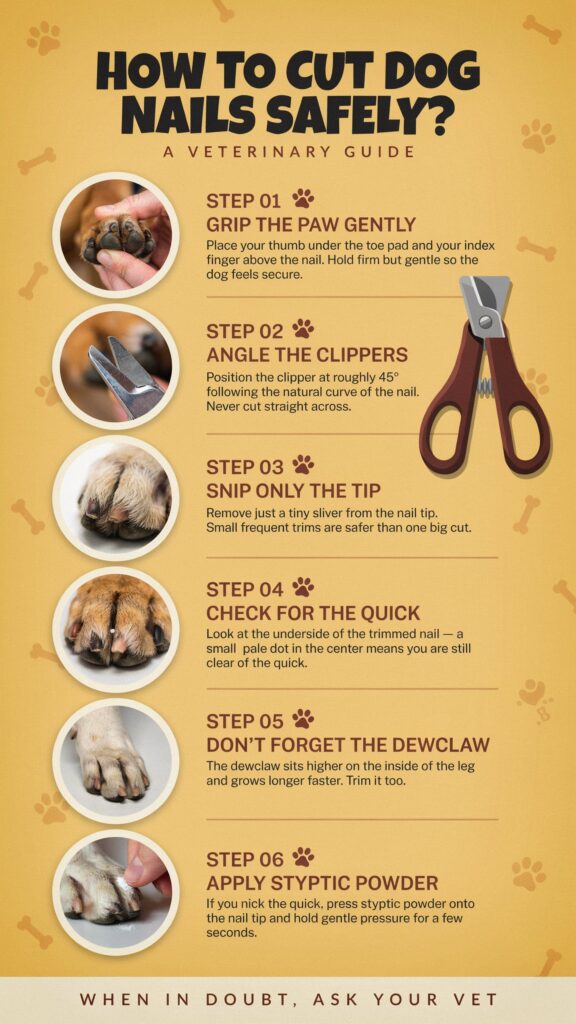
- 1. Hold the paw correctly. Place your thumb on the pad of the toe and your finger on top, above the nail. Push the pad back slightly while pushing the toe forward — this extends the nail and makes the cutting line obvious.
- 2. Cut at an angle, not straight across. Follow the natural curve of the nail rather than chopping straight through it. A flat cut increases the chance of catching the quick at an awkward angle.
- 3. Take off small slivers, not big chunks. This matters more on dark nails than anything else in this guide. A few millimeters at a time, checking after every single cut, beats one confident slice every time.
- 4. Check with the pressure or underside test after each cut. Stop the moment you see softness, a dot, or that hollow underside change.
- 5. Don’t forget the dewclaws. The small nail on the inner side of the paw doesn’t touch the ground and gets overlooked constantly, which means it grows long and curls if ignored.
- 6. If you do hit the quick: apply styptic powder directly and hold light pressure for about 30 seconds. No styptic powder on hand? A pinch of cornstarch or plain flour pressed onto the nail works as a genuine backup. In a real pinch, a small dab of superglue on the tip of the nail will also stop the bleeding — not glamorous, but it works.
If Your Dog Has Already Been Quicked Before
This is the situation most articles skip past, and it deserves real attention because the fear runs both directions — yours and your dog’s.
Trim more often, take off less each time. Going every 3 days instead of every 3 weeks, removing just a couple of millimeters per session, is genuinely easier on both of you than waiting and trying to catch up all at once. The quick naturally recedes a little as you do this consistently, which means each session gets a bit more forgiving than the last.
Watch your dog’s body language, not just the nail. If your dog pulls their paw away, that’s information — it usually means you’re pushing further than is comfortable, even before you’ve actually hit anything. Easing pressure the moment you feel resistance prevents most accidents before they happen.
When Your Dog Won’t Cooperate at All
Some dogs don’t just dislike nail trims — they actively fight them, sometimes badly enough to get turned away from grooming salons. Here’s a real approach that’s worked for owners in exactly that spot.
- Split front and back paws into separate problems. A scratch board — a textured board with a treat compartment a dog naturally scratches at — can handle front nail maintenance almost entirely on its own, no handling required. Search “dog nail scratch board” to find one.
- For back paws, combine bath time with desensitization. If your dog tolerates baths, use the running water as background noise and a partner with peanut butter as distraction while you simply get comfortable holding a back leg and touching the foot — no clippers yet, just contact.
- Decouple the sound from the cutting separately. Show the clippers, use a consistent warning cue, then cut a piece of a wooden chopstick to recreate the “click” sound, paired immediately with a treat. Dogs afraid of the noise itself often come around faster than expected.
- Bring it together gradually. Water on for white noise, distraction treat ready, calm warning cue, one nail clipped, big praise. One nail is a win. This takes weeks for a genuinely fearful dog, and that’s normal.
A Real Safety Warning About Nail Grinders
If your dog has a fluffy coat or longer fur around the paws, be careful with a grinder near that hair. The spinning bit can catch loose fur and pull the tool suddenly — and the instinctive reaction is to yank back hard, which can injure the paw or tail if either is anywhere near the grinder when that happens. Trim or hold back the fur around the foot before you start, and keep the grinder moving rather than holding it still in one spot.
How Often Should You Trim?
If you can hear your dog’s nails clicking on hard flooring, they’re already overdue. Most dogs need a trim every 3–4 weeks, though dogs who are anxious about the process often do better with smaller, more frequent sessions — every few days, taking off less each time — rather than one longer session once a month.
FAQs
The Real Takeaway
Nail trimming gets easier with repetition, both for your confidence and your dog’s tolerance. Small cuts, frequent checks, and treating every session — successful or imperfect — as practice rather than a test is what actually builds the skill over time.
If you’ve made a nail bleed before, that doesn’t mean you can’t do this. It means you go slower next time and check more often. That’s it.