
Why does my makeup look perfect at 9am and patchy by lunch, especially around my nose and chin?” If that sounds familiar, the problem is rarely one bad product. It is usually where oil, movement and thick layers meet.
Prep can’t change your skin type, but it gives your base a stable surface to sit on. Results still depend on your skin, sunscreen, foundation and climate, so treat this routine as a starting point and adjust it to your face. Let’s get deep in this How to prep oily skin for makeup and get everything done in less.
Placement, not punishment
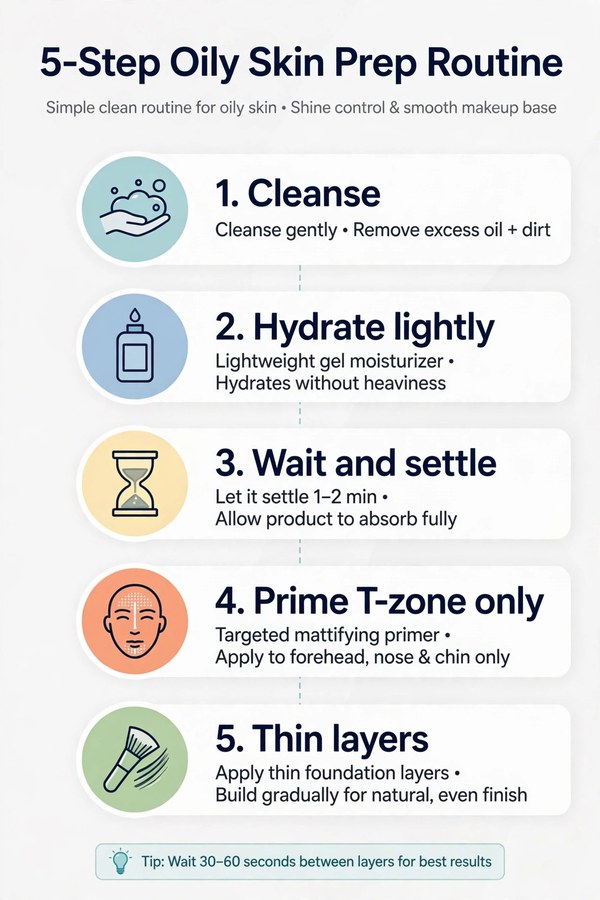
Good skin prep for oily skin is about placement, not punishment. Cleanse gently, apply a light gel moisturiser, then sunscreen, and let each layer settle. Put mattifying primer only where shine breaks through, usually the T-zone. Apply foundation in thin layers, set only the zones that move, and blot before you add more powder.
The shaded T-zone is where primer and powder go
- Cleanse gently.
- Light gel moisturiser.
- Let each layer settle before the next.
- Mattifying primer only where shine breaks through, usually the T-zone.
- Foundation in thin layers.
- Set only the moving zones with powder.
Why Oily Skin for Makeup Separates?
Separation usually happens where oil, movement and thick product meet. The T-zone (forehead, nose and chin) gets shinier first, while the cheeks may stay fine. Thick foundation over that area lets oil work under the edges, so the base slides, gathers around the nostrils or breaks into patches.
Wet layers make it worse. If moisturiser or sunscreen is still slippery when foundation goes on, the base sits on a moving film instead of settled skin. Pressing and patting keeps each layer where you put it.
Step 1: Cleanse Gently, Do Not Strip the Skin
Scrubbing shine away usually backfires: a harsh cleanse leaves skin feeling tight, and tight-feeling skin gives the next layers an uneven surface to grip.
Cleanse gently, once, in the morning. Use lukewarm water and a gentle cleanser you already tolerate, then pat dry instead of rubbing. If your skin already feels comfortable and there is no sweat or leftover product on it, you do not need to strip it back to bare skin before you start.
Remove what is actually in the way — sweat, excess oil, last night’s residue — and leave the rest alone. Do not pile on strong new actives on the morning of an important event; a product that irritates or pills is a bigger problem than a little shine.
Step 2: Use Lightweight Hydration
Skipping moisturiser rarely saves the day. Oil is not hydration, and a base on dry, tight-feeling skin can cling in some places and slide in others.
Choose a gel or water-based moisturiser labelled oil-free or non-comedogenic. Apply a thin layer, using a little less on the T-zone if it already feels slick, and let it settle until the surface no longer feels wet. A clean fingertip should not move a visible layer.
If one patch still feels tight, add a tiny amount only there, not a second layer over the whole face.
Step 3: Apply Sunscreen
Sunscreen goes on after moisturiser and before primer. Apply it as directed on the label and let it dry before you continue. Do not skip it, thin it out or blot it away to make makeup sit better. Makeup is not a substitute for sun protection, and sunscreen needs reapplying during sun exposure.
If your sunscreen feels slippery under makeup, try a different texture, such as a gel or fluid formula, rather than using less of it. Our sunscreen before or after primer guide covers the order in more detail.
Step 4: Use a Targeted Mattifying Primer
Primer is a zone tool, not a second moisturiser. It can blur pores and give foundation grip, but only where you need it. Spread over the whole face, it adds thickness and hides which layer caused a later problem.
For shine that sits in the centre of the face, apply primer to the T-zone. If you also shine elsewhere, such as the sides of the cheeks, extend it there and nowhere else. Warm about a pea-sized amount between your fingertips (a starting point, not a rule), press it over the forehead, nose and chin, and leave balanced cheeks alone. Give it a minute to set, or follow the label if it says otherwise.
If primer pills, stop. You have probably used too much, rushed the layer underneath, or paired formulas that do not sit well together. Remove the affected patch, simplify, and try again with less product.
Matching the primer family to your foundation family is a useful starting point, but not a guarantee. Test a new pairing on one side of the face before a long day. Our skincare before makeup layering order guide explains where primer fits in a full routine.
Step 5: Apply Thin Foundation Layers
Once prep has settled, less foundation usually lasts longer. A thick layer has more to move, gathers in smile lines and transfers easily. A thin layer, built only where coverage is missing, stays flexible and looks more like skin by afternoon.
Start from the outside in. Apply foundation to the cheeks and jaw first with a damp sponge or brush, pressing rather than sweeping, then use what is left on the tool across the centre of the face. That keeps the T-zone, the area most likely to move, deliberately thin. Add a second sheer layer only on spots that still need coverage, and let the first layer settle before you judge it.
If shine is your main concern, choose a matte or natural-matte, oil-free, long-wear formula and avoid dewy finishes on the T-zone.
Set the T-Zone Strategically
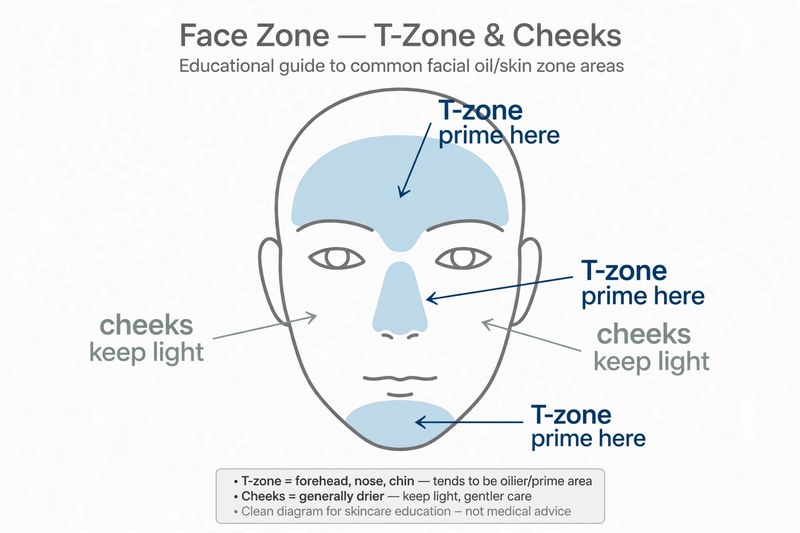
Powder is for movement, not for the whole face. Pressing a small amount of translucent powder into the forehead, the sides of the nose, the upper lip and the chin locks down the zones that slide first, while leaving the cheeks with a more natural finish.
Press, do not sweep. Use a small brush or a damp sponge, press the powder into the skin, then check in natural light before adding more. Sweeping a large fluffy brush over the whole face deposits powder where it is not needed, and that is how a fresh base starts to look dry and textured by midday.
Setting spray works best as a finishing step, not a rescue. A light mist over an already-set base helps the layers look cohesive, but it cannot fix a thick, unset base. Our guide to why makeup pills covers spray order.
Touch Up by Blotting, Not Caking on Powder
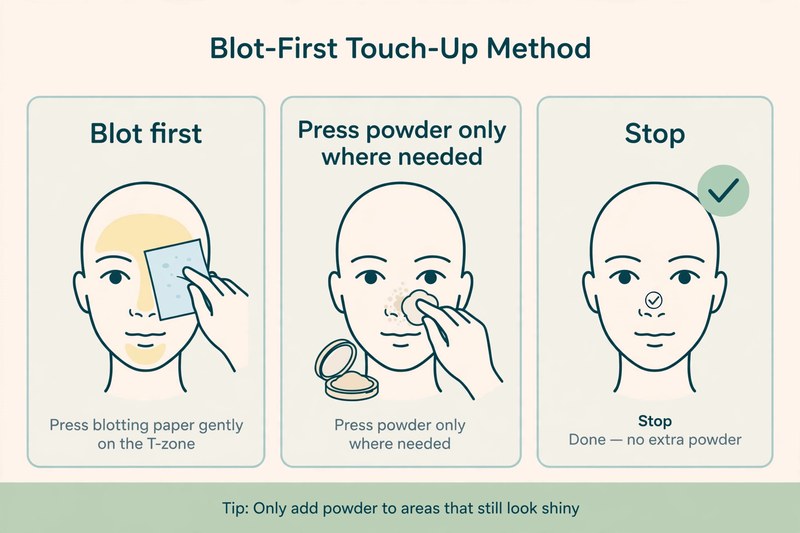
By mid-afternoon, shine will probably return somewhere. That is normal, not a failed routine. Treating it with another full layer of powder turns shine into paste, and paste is what looks cakey.
Blot first, then decide:
- Press blotting paper or a clean tissue gently onto the shiny area. Do not rub, or you will spread oil and disturb the base.
- Once the surface is dry, press the base flat with a clean sponge edge if it has lifted.
- Add a tiny amount of powder only where shine is still showing.
- Stop there.
Blotting paper lifts surface oil without adding pigment, and the pause stops a quick fix from becoming a third layer.
Blotting papers can remove surface oil without adding pigment; a light powder touch-up may also work after blotting: lighter, no added coverage, and they force the pause that stops a quick fix becoming a third layer.
Hot/Humid Weather Adjustments
Heat and humidity change how products feel and wear. Sweat sits on makeup, sunscreen needs time to dry, and every extra layer has more reason to move. The answer is a lighter, more disciplined routine, not a heavier one.
- Thin the optional layers, not the sunscreen. Use the lightest moisturiser your skin tolerates comfortably, and apply sunscreen as directed.
- Let sunscreen dry before makeup goes on.
- Keep foundation sheer through the centre of the face.
- Set only the movement zones, then finish with setting spray and let it dry untouched.
If you are outdoors for hours, a lighter base or spot concealing may wear better than full coverage. Sunscreen reapplication matters more than sealing makeup in place. Our waiting-time guide covers how long to leave between layers.
Oily Skin Mistakes
Most oily-skin makeup problems come from a short list of habits. Check yours before buying anything new.
| Mistake | Why it backfires | Do this instead |
|---|---|---|
| Skipping moisturiser | Leaves an uneven, tight-feeling surface for foundation | Use a thin gel moisturiser and let it settle |
| Skipping or thinning sunscreen to help makeup sit | Removes sun protection, and makeup cannot replace it | Apply as directed, try a lighter texture, and let it dry |
| Mattifying the whole face | Adds thickness where skin does not need it | Prime and powder the T-zone only |
| Applying foundation while skincare is wet | The base sits on a moving film and slides | Wait until each layer feels settled, then press foundation in |
| Powdering over oil | Turns shine into paste and cakiness | Blot first, press flat, then powder only where needed |
| Adding foundation at touch-up time | Builds a second, heavier base over the first | Blot, press flat, and stop unless coverage is genuinely missing |
If you change one thing, make it blot-first. It takes ten seconds and keeps makeup fading gracefully instead of getting heavier with every fix. Our moisturiser or primer first guide settles the order question.
Frequently Asked Questions
Conclusion
Lasting makeup on oily skin is not about drying your face out or buying a stronger product for every step. Good skin prep for oily skin means gentle cleansing, light hydration, settled layers, primer and powder placed only where shine actually breaks through, and touch-ups that blot before they add.
Try the routine for a full day, change one variable at a time if something slides, and keep the version that holds up on your skin. Your next step is the skin prep routine for a smooth base in article #25, if you want the general order alongside this oily-skin version.
References
- BeautyLearn — How to Prep Skin Before Makeup: Order & Timing
- Maybelline India — Makeup for Oily Skin Step by Step
- Huda Beauty — 5 Makeup Hacks for Oily Skin You Need to Know
- Max Factor — The Best Foundation Routine for Oily Skin
- Shelzys Beauty — Makeup Melting Off Face? Sweat-Proof Makeup Routine
- InStyle — The 11 Best Primers for Oily Skin, Tested & Reviewed
- Sephora Beauty Insider Community — Primer for oily skin (search-snippet verified)
- Sephora Beauty Insider Community — Foundation Separation (search-snippet verified)
